

How to improve videos right now with these 2 tricks
Today, videography is a part of our everyday lives. Whether grabbing your phone to record every inch of that double rainbow or get a video of a pet doing something adorable, the tools to create great visual content is at our fingertips. But having the tools isn’t always enough. To improve videos, you’ll need to build skills.
Great videography is a craft that takes years to perfect. It takes visual art into motion and adds its own level of complexity. However, there are several tricks that can improve your videos dramatically! And though I focus heavily on video in this article, the same principles hold true for photography, drawing, and other visual art. Here are 2 things (+ lots of tips) that you can use RIGHT NOW to level up your next video.
In this post, you’ll learn how to improve your videos (and other art) in 2 ways:
1. Improve videos by checking your lighting
The absolutely most important thing you can do to improve videos and photos is to improve the lighting. Many pictures I see others create are backlit or much too dark. Sometimes lighting in videos is much too bright, making it difficult to distinguish features. Slight issues with brightness and contrast can be fixed after the fact, but let’s talk about what you can do while taking your pictures to improve the lighting.
Add natural lighting
Much of the lighting we use indoors is tinted. Fluorescent light has a green tint, while lighting seeking the incandescent look often appear yellow. Phone cameras are able to correct for this rather well, but natural light is often much nicer. Here are ways to use natural lighting to improve your images.
Simply adding natural light can be a dramatic improvement.
Build a feeling
Do you want to evoke an emotion with your video or photo? Lighting choices can do exactly that, and that ambiance can improve videos and photos. Adding a light below and behind your subject can add a halo or rim of light that gives a flavor of intensity. A strategic shadow will create a sense of mystery. Documentaries regularly use intense shadow and lighting the background to hide a subject’s identity.
It’s important to know the kind of feeling you want to evoke in your audience. Once you’ve figured this out, do a Google or Pinterest search. Find images that inspire you. Then you can start to analyze them.
Here are some questions to ask yourself about your favorite images:
Add color
It’s so quick to snap a picture that we sometimes forget about adding flavor. Flavor can come in many…well, flavors. But one of the easiest ways to add excitement that improves videos and photos is to add some colored lighting.
You can use a lamp or a clip light. A piece of colored film, which can be bought at a craft store, placed over the light will be enough to add some color.
Placing that light behind and below the subject can add a colored rim light on the dark side of the subject. If you instead place the light in front of your subject on the dark side, it will add a dimmer color that can be quite dramatic. The most extreme case would put the colored light as the key light, which is great for purposefully dramatic or themed.
2. Make better videos by perfecting your compositions
Other than lighting, the most common mistake I see in videos and photos is based on composition. These are such simple fixes! I hope you’ll consider them next time you snap a selfie or film your next YouTube video.
Composition is how you place your subject in the frame. It’s important because the composition leads people’s eyes, add or relieves tension, and can add or detract from the look of professionalism.
Just as with lighting, the theory of composition is long-winded. But just as with lighting, small adjustments can make better videos that far outweigh the effort. Let’s get into it.
Remove clutter
When I was in film school, one professor gave me a piece of advice I never forgot. That advice dealt with how most people look through the eyepiece, in other words, what people look at when they view a scene or image. When most people take a picture, they look at their subject, and the rest of the scene is often ignored. However, a quick look at the four edges of the screen can do wonders.
Redirect your attention to the background of your scene. What’s back there? Is any of it distracting? Distracting material can be bright in color, too similar to your subject, or is just out of place.
Extra or unorganized chairs? Trash? Excessive paraphernalia?
One of the best ways to do this is to take a picture of the scene as it will be. If you are the subject, go ahead and take a timed picture. Or do a quick practice video and move around. Then, ignore yourself and look around at the rest of the image. You may notice something amiss!
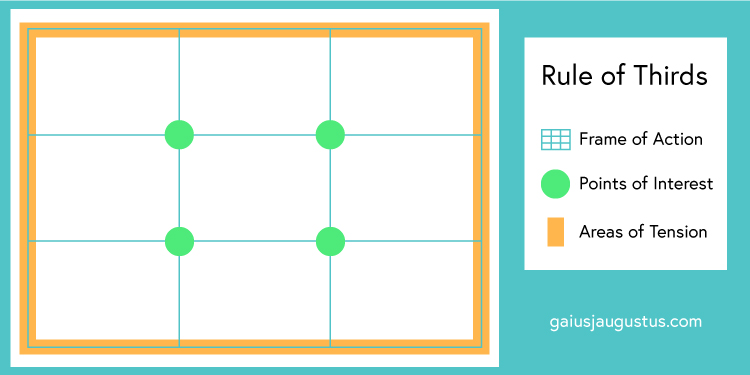
Rule of thirds
You may have heard of this rule before. In essence, you divide the screen into 9 equal boxes (a 3 x 3 grid). By aligning items to these lines and the intersecting points, you can ensure a well-balanced and interesting picture. Things that intersect the cross-sections tend to be the best places to put things you want to bring interest to. When things are cut off or too close to the edge of the frame, this can cause tension. These concepts are often difficult for people to implement initially become second nature after just a bit of practice.
The mistakes below are by far the most common composition issues I see, and you can make better videos instantly with these easy fixes. The most common mistakes I see in videos are:
Foreground vs Background
Something many people take for granted is our ability to differentiate a subject from its background. Our eyes are designed to do this in real life, but when captured in a photo or video, that ability is lost. Improve videos and photos by creating a sense of space and separate the foreground from the background.
Photographers and videographers have tricks to do this. One of the most common is to blur the background. There are many ways to do this, but that’s really beyond the scope of this post. But there are a couple of simple ways to separate the foreground from the background.
I hope this gives you some great ideas for your next project. As I mentioned at the beginning of the post, to improve videos or photos takes time and practice, but with these tips, you can make some big changes very quickly!
Want to know more? Let me know in the comments. Need help with your lighting or composition on your next creative project? Contact me today.
And until next time, keep your creativity flowing!